YouTube to TikTok Converter: How to Repurpose Long Videos as Shorts
Last Tuesday I had 11 YouTube clips that needed to become TikToks by end of day. Dora mode: activated. I'd done this dozens of times before, but this batch was my first real stress test of a newer reframing workflow — and somewhere around clip seven, I realized most "YouTube to TikTok converter" guides miss the actual hard part.
It's not the export. It's not even the aspect ratio. It's the fact that YouTube and TikTok are structurally different formats, and treating conversion as just a resize is how you end up with boring vertical rectangles nobody watches.
Here's what I mean — and how to do this right.
What "Converting" Actually Means
It's Not Just Resizing — It's Restructuring
A YouTube video is built for lean-back viewing. The hook can take 10–20 seconds. Context is expected. Viewers came to you intentionally.
TikTok is the opposite. You have maybe three seconds before a thumb swipes. The algorithm prioritizes watch time above all other metrics, and every video starts with roughly 200 test viewers — strong completion rates push content to larger audiences. That means a clip that opens slowly on YouTube will die fast on TikTok, regardless of how well you resized it.
The mental shift: You're not converting a file. You're identifying which 30–60 seconds of your YouTube video already works like TikTok content — a punchy moment, a reveal, a take — and building the short around that.
What Changes Between YouTube and TikTok Formats
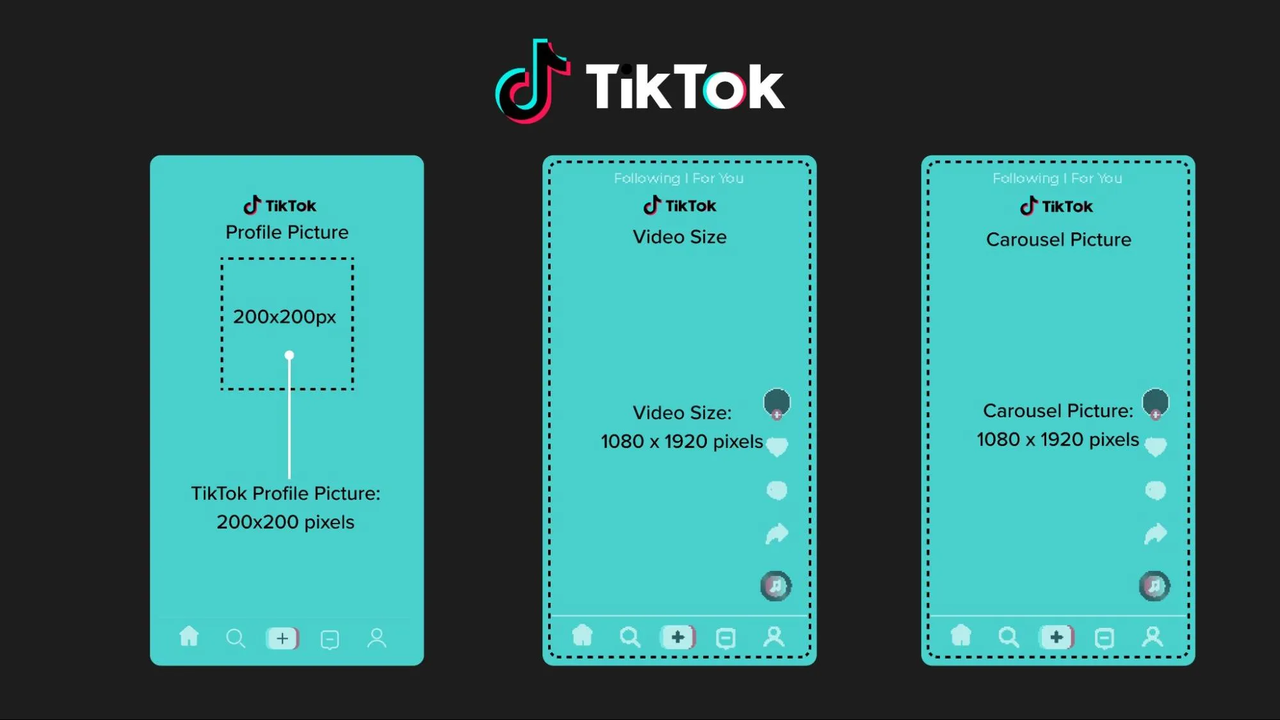
The technical differences matter too. TikTok requires a 9:16 aspect ratio at 1080 × 1920 pixels, supports MP4 and MOV files, and has a safe zone for text and visuals of roughly 900 × 1400 pixels centered within the frame — keeping content at least 370 pixels above the bottom edge and 180 pixels from the right edge.
YouTube defaults to 16:9. That's not a small difference — you're rotating the entire visual logic of the frame. Wide shots that looked balanced become awkward close-crops. Two-person interviews lose one speaker entirely.
Step 1 – Pick the Right Clips
The Hook-First Rule for Short Clips
I used to scrub through a 20-minute video looking for "good moments." Now I do it differently: I look for the first sentence that could stand alone without context. That sentence is my potential hook.
If the whole clip requires 45 seconds of setup before anything interesting happens — skip it. That's not a TikTok. Each long-form video is essentially a goldmine of potential viral moments waiting to be clipped — podcasts, tutorials, webinars — but only the moments that have immediate, standalone energy translate.
Identifying Quotable or Shareable Moments
Scan for:
A strong opinion stated directly — "Most people do X wrong."
A before/after reveal — data, transformation, result
A demonstration — something visually happening, not just being described
A counterintuitive claim — something that makes the viewer pause
Avoid: recap moments, transition phrases, anything that starts with "So as I was saying earlier..."
Step 2 – Resize and Reframe
16:9 to 9:16 Without Losing the Subject
Here's the part that breaks people. You can't just drop a 16:9 clip into a 9:16 frame and call it done. Cropping from horizontal to vertical means you lose up to 70% of your original image, and scaling beyond 200% produces visible pixelation — so if you need to scale more than that, the clip simply isn't suitable for vertical conversion.
Three approaches, ranked by quality:
AI smart reframing (recommended for most content) — Tools detect the main subject — usually a face — and dynamically reposition the crop as it moves through the frame. This is far better than a static center crop for anything with motion or multiple speakers.
Manual center crop — Works when your subject is stationary and centered. Fine for product close-ups, screen recordings, or static shots.
Split-screen layout — Place the original 16:9 footage in the top half of the 9:16 frame, use the bottom half for captions or B-roll. Good for tutorials where the visual context matters but isn't cinematic.
Tools That Handle Reframing Automatically
A few worth knowing:
OpusClip — AI subject tracking, detects faces and motion automatically, no manual repositioning needed

CapCut — Mobile-friendly, fast, solid for single-subject clips; manual repositioning is often still needed to keep key visuals in frame
Wondershare Filmora — Desktop-grade with an Auto Reframe feature that intelligently tracks subjects during the 16:9-to-9:16 conversion
Reap.video — Handles reframing as part of a wider repurposing workflow including clipping, captions, and export in one pass
My honest take: for batch work at volume, OpusClip saves the most time per clip. For one-offs where you want control, CapCut is fast enough.
Step 3 – Add Captions for TikTok
Why Captions Are Non-Negotiable on TikTok
I skipped captions on my first 40 TikToks. The re-edit rate was painful.
Here's the data: according to internal TikTok reports, videos with captions see a 12%+ increase in average watch time and higher completion rates. And the algorithm now prioritizes watch time above all other metric — which means captions directly affect distribution, not just accessibility.
A big portion of TikTok viewing happens in public, on mute. If your video doesn't work without sound, it doesn't work on TikTok. Full stop.
Caption quality also matters now. The ideal caption line contains 3 to 7 words, displayed for 1 to 3 seconds — shorter chunks are easier to process and allow viewers to glance at the caption and back to the visual action without losing context.
Auto-Caption Workflow
The fastest reliable workflow:
Upload your reframed clip to CapCut, VEED.io, or OpusClip
Run auto-captions — takes under a minute for most clips
Review every line manually — slang, product names, and fast speech all cause errors
Style for readability: bold font, thick outline or pill background, placed in the safe zone
Export with captions burned in
TikTok's native auto-captions feature is free and fast, but it doesn't allow you to change fonts, colors, or sizes, and has no multilingual support — so for anything beyond basic, use a third-party tool before uploading.
Step 4 – Export for TikTok Specs
File Format, Resolution, Max Length
The specs that actually matter:
Spec | Requirement |
Aspect ratio | 9:16 |
Resolution | 1080 × 1920px |
File format | MP4 (Android), MOV (iOS) |
Max file size | 2 GB |
Max upload length | 60 minutes |
Safe zone for text | 900 × 1400px centered |
One thing most guides skip: TikTok overlays UI elements on top of your video — keep all important content, especially text overlays, faces, and CTAs, at least 370 pixels above the bottom edge and at least 180 pixels from the right edge. If your caption or key visual sits too low, TikTok's own UI covers it.
Export at 1080p. 4K uploads get downscaled by TikTok anyway, so there's no quality gain from going higher — you're just uploading a bigger file for the same result.
FAQ
Q: Do I need permission to repost my own YouTube content on TikTok?
If you own the content, no — you have the right to distribute it on any platform. The complication arises with background music: if your YouTube video used licensed music through YouTube's audio library or Content ID, that license often doesn't transfer to TikTok. Re-edit with TikTok's royalty-free audio library or remove the original audio entirely before uploading.
Q: Will TikTok flag reposted YouTube content?
TikTok uses its own content detection system, separate from YouTube's Content ID. If your video contains copyrighted music, sound effects, or clips from third-party sources, it may get flagged regardless of where it was originally posted. Your original footage and voiceover won't trigger flags. Watermarks from YouTube or other platforms won't cause automated flags, but they look unprofessional and signal recycled content — worth removing.
Q: What's the best tool to convert YouTube to TikTok?
Depends on volume. For 1–3 clips: CapCut is fast, free, and good enough. For 5–20 clips in a session: OpusClip handles reframing, captions, and branding in one workflow. For batch repurposing at scale (50+ videos): dedicated platforms like Reap or support bulk processing with consistent output settings. There's no single best answer — it's a volume question.
Q: How long should a TikTok from YouTube be?
Data from 2025 shows that 60–180 second clips perform well when watch time percentage is maintained — the platform is shifting from "short-form" to "engaging-form," where length matters less than retention. For repurposed YouTube content, I'd aim for 45–90 seconds as a starting point. Short enough that a viewer who commits gets a complete thought; long enough to deliver real value.
Q: Can I automate this workflow?
Partially. The reframing, captions, and export can all be automated with current tools. What can't be automated well yet: selecting which moments from a long YouTube video are worth clipping in the first place. AI clipping tools exist and are getting better — OpusClip's viral moment detection is genuinely useful — but they still produce a lot of average clips alongside the good ones. Budget 5–10 minutes of manual clip selection even in a fully automated setup, and your output quality will be meaningfully higher.
I'm still testing whether batching the reframe and caption steps in the same tool (versus splitting them across two) actually saves time at the volumes I'm running. It probably does. I'll update this when I have cleaner data.
If you're repurposing long videos regularly, this workflow cuts the per-clip time significantly. If you're doing it once a month for a single video — honestly, CapCut and TikTok's native tools are probably enough.
Previous posts: